By Via Mazzini
Try
them on and we hope they turn out great for you! Don’t be afraid to
try out different color combinations, the trick is use the lighter or
contrasting shade for the moon of your nail. Consider updating your
look, and trying this untraditional trend for your next big occasion!
Via Mazzini
It was said that there's nothing that says 'CHIC' more than a clean, crisp, classic French Manicure...Well that
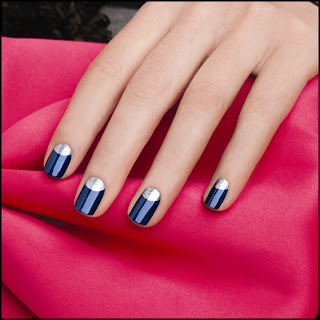
was actually true until the Reverse French Manicure came along! This uber glamorous nail
trend has been seen all over, from red carpets to runways, and
surprisingly it's pretty easy to do yourself! For years the original
French manicure has been womens’ go-to look for just about every
occasion, be it a dinner party, wedding, or any other social get together, these
traditional tips were sure to be seen. The traditional soft pink base
with pristine white tips was a classic design for any fashion conscious female.
But now women yearn for more, something a little edgier? An untraditional take on
the classic French manicure? So evolved the Reverse French Manicure with any two
colors of your choice - pairing a darker base with a
sparkly hue, or metallic on metallic, dark on dark, or mixing soft and dark shades together. The options are endless!
Unlike
the Reverse French Manicures of past trends, which show white nails
with black tips, the season’s Reverse French takes an avant guard
turn with a half moon curved ivory bottom to the nail with the rest
of the nail black. The Reverse French, was originally know as the
"half-moon" manicure and first showed up in the the 1920's,
reaching mass popularity during the 1930's.
What
you will need to get these nails:
• A
base coat
• 2
different nail colors of your choice
•
Self-adhesive
hole reinforcements
• A
quick drying topcoat
•
Acetone
Here's how you can get 'em!
Soak hands in warm water to soften them and use a cuticle pusher
to push back your softened cuticles, leaving more room to paint. This
will also create a smoother surface for the nail polish. Start with a buff, freshly cut and shaped nails in a slightly shorter style.
Step 1 : Apply two thin coats of light pink nail polish on each nail. This
is the base coat for the manicure. Let dry completely. This prevents
staining your nails and helps the polish wear longer and helps
prevent chipping. If you don't have a base coat, use a clear polish
to at least put a barrier between your natural nail and the colored
polish.
Step 2 : Pick one color for your half moon section and apply in a
straight line. We recommend a fast drying polish because you will
need to wait until your base coat is completely dry. If the base coat
is not completely dry the polish may be lifted off when you remove
the masking tape.
Step 3 : Take the self-adhesive hole reinforcements and cut them down in
the middle. Apply one sticker to each nail making sure the round side is
facing down from the cuticle towards the end of your nail covering
the first color about 2-3mm. Make sure the sticker is placed on
securely to prevent the polish from bleeding onto the base color(Another variation of this type could be to use the hole reinforcement sticker the other way i.e. round side is facing up).
Step 4 : Apply the second color to the rest of your nails from the round
part of the sticker to the tip of your nails very slowly. This
creates a moon at the bottom so the focal point is near the cuticle
rather than the tip.
Step 5 : Once the second color has completely dried remove the stickers
slowly from one side only and then clean up any unwanted edges with
acetone. If done correctly, you should have gotten a nice crisp moon
shape on your nails.
Step 6 : Apply a clear top coat of polish. This will help lock in the
polishes and create a nice shiny look.
And Voilà,
you are done. This manicure is a little fiddly to achieve, but with a
bit of patience you can have this great looking moon down nail art
that's hot off the runways and can enjoy the compliments you'll
get on this eye-catching manicure.
So, what
do you think folks? Hit or Miss .. You decide?
As
we go along we promise to keep our eyes peeled, on behalf of our
amazing fans and report on any trends that may crop up. So stay
connected!
XOXO


No comments :
Post a Comment