By Via
Mazzini
Friendship Day (celebrated every first Sunday of August) is just around the corner. A day dedicated to celebrating friendship; the day everyone reaches out to their friends with smiles and joy and thank them for their love and support. Our lives are always so hectic, with little time to spare, but it's a wonderful feeling just to let others know that you're out there, and that you care..
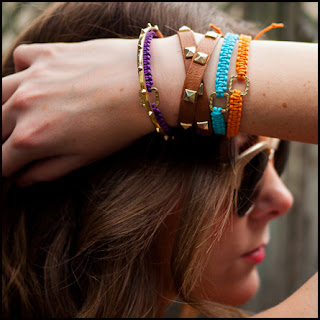
The most important person in your life (your BFFer, of course) is always hard to buy for and nothing says ‘you’re my best friend in the world’ more than a little nostalgia and a friendship bracelet. There's just something beautiful about friendship bracelets. We don't really know if friendship bracelets have ever gone out of style, but it certainly appears that they are becoming more popular now than they were in yester years.. Yep, the same type that you and your girlfriends used to make and trade when you were tweens—except that you probably won't want to trade these ones.
So, just in time for the friendship day we bring to you a small tutorial on how you can make your own friendship bracelet for your bestie.
Waxed cotton cord or embroidery thread(in any colour of your choice), connector charm(as available), scissors, tape, ruler, and glue.
You can also order our Friendship Bracelets : Blue Braided Tie On Friendship Bracelet and Pink Braided Tie On Friendship Bracelet. Wow your friend with these sophisticated friendship bands, mix and match, wear as a set or individually, for instant on trend colour pop.
So, love you friends extensively and forgive always. Happy Friendship Day!
Whether you're a prim and proper accessory lover or someone who wants to push the boundaries of style, Via Mazzini has something for every fashionista. Looking for more inspired gift ideas? Check out our collection HERE.
Friendship Day (celebrated every first Sunday of August) is just around the corner. A day dedicated to celebrating friendship; the day everyone reaches out to their friends with smiles and joy and thank them for their love and support. Our lives are always so hectic, with little time to spare, but it's a wonderful feeling just to let others know that you're out there, and that you care..
The most important person in your life (your BFFer, of course) is always hard to buy for and nothing says ‘you’re my best friend in the world’ more than a little nostalgia and a friendship bracelet. There's just something beautiful about friendship bracelets. We don't really know if friendship bracelets have ever gone out of style, but it certainly appears that they are becoming more popular now than they were in yester years.. Yep, the same type that you and your girlfriends used to make and trade when you were tweens—except that you probably won't want to trade these ones.
So, just in time for the friendship day we bring to you a small tutorial on how you can make your own friendship bracelet for your bestie.
What You’ll Need:
Waxed cotton cord or embroidery thread(in any colour of your choice), connector charm(as available), scissors, tape, ruler, and glue.
How To Do The Bracelet:
- Cut the knotting cord into two 30 inch, two 20 inch and one 10 inch lengths. Fold the 20 inch piece in half, pull the loop through the connecter charm, fold it over, and pull the rest of the cord through the loop. Repeat the step on the other side of the charm. These strands will remain anchored.
- Tape it to something sturdy so the bracelet is secure while you make the knots. Center the 30 inch cord under the two middle strands. Fold the right cord over the middle strands and under the left cord.
- Pull the left cord under the right and middle strands and through the loop on the right side. Pull the strands tight and push the knot up to the top. To finish the other side of the knot, fold the left cord over the middle strands and under the right cord. Pull the right cord under the left and middle strands and through the loop on the left side. Continue going back and forth until you get to the desired length (keep in mind that the clasp will take up approximately half an inch) and then move on to the other side. See video below.
- To finish the knots, thread both cords up 3–4 knots along the backside. Pliers or a needle may help with this.
- Cut the ends and dab them with super glue so that they are even more secure. Do this process to both sides.
- To create a sliding closure, shape the bracelet into a circle and overlap the ends. Using scrap cord, temporarily tie at the ends. Take the 10 inch cord and center it under the strands. You’re going to start the knot exactly the same way you did before.
- Create 4–5 knots and finish the ends the same way you did before. Undo the temporary ties. The two sets of middle cords become the adjustable ties of the bracelet. Adjust it to fit your wrist and trim the ends.
 |
| Source : Ciera Holzenthal |
You can also order our Friendship Bracelets : Blue Braided Tie On Friendship Bracelet and Pink Braided Tie On Friendship Bracelet. Wow your friend with these sophisticated friendship bands, mix and match, wear as a set or individually, for instant on trend colour pop.
So, love you friends extensively and forgive always. Happy Friendship Day!
Whether you're a prim and proper accessory lover or someone who wants to push the boundaries of style, Via Mazzini has something for every fashionista. Looking for more inspired gift ideas? Check out our collection HERE.
Your favorite source of fashion accessories,
Via Mazzini


No comments :
Post a Comment